TYTILIDIE
METH HEAD
Ok boys and girls, Ive put together some solid information and am going to try and share it the best I can with everyone. First let me start by saying this, although all the info is here on this in various posts and links, it took me several hours and coming back while I was actually doing it. So hopefully, this will be enough to not have people confused.
Mod Pro's and Con's:
PRO's: CON's:
Eliminate Rag joint Machine work involved (or semi tedious grinding)
Eliminate CV joint
Uses two U-joints
Bolt on deal with little modification
Looks much much cleaner than stock
Cheap mod
Fights steering slop
Im going to start off saying that this can be done by anybody who has coomon sense and has decent or good skills with a grinder, sawzall and a Dremel. You have to start with a trip to the junk yard. I got mine off of an '88 Jeep Cherokee 4x4. I looked at some 2x4 and 4x4 and didnt really notice any differences. Now these years went from 87ish to 94 I believe, like TRY ME said in one of his posts, its the boxy style. And its not in the sport or the grand. I only say this part because I didnt see any in the JY.
Once you have your shaft, go home :lol: I paid $8 for my shaft. First thing, pull the shaft apart, mine was old and stcuk but I got a vise and put a pipe wrench snug on the lower half and gently tapped it out. Once the shaft is out you want to grab the inner shaft and cut off 5" with a sawzall and you should have somethign like this:

Now for this part, I would definately recommend a machine shop, you have to slot the new shaft just how the old shaft is. I did it this way to re-use the spring retainer that goes in the stock shaft. This is done to take the play out of the shaft when they are put together. The length is 2 3/4" and the depth is almost 1/8". When you are doen it should look like this:

The stock shaft is on the left and the new shaft on the right. Just to the left of the new shaft is the spring retainer we are machining for.
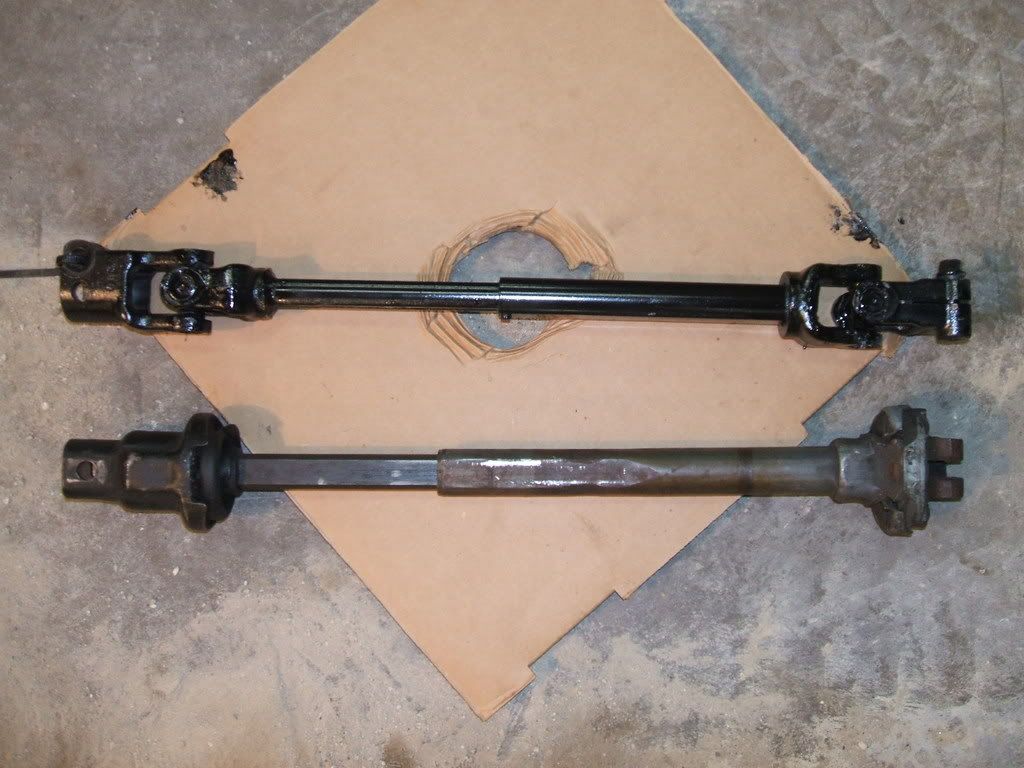
Now you clean up your piece and paint it if you want. Then take your lower shaft and slide it into your upper shaft for a test fit (if you machined it yourself that is). You should have this:

And collapsed:

It should be pretty obvious which one is upper and lower, just look at your steering column and gear box. When I installed mine, I installed the upper first and tightened down the bolt. Then I installed the lower, do not forget the spring retainer or you will have play. It is not very slideable with the retainer in there so I used a pickle fork on a joint and tapped it on down from the wheel well. Hope this helps.
Mod Pro's and Con's:
PRO's: CON's:
Eliminate Rag joint Machine work involved (or semi tedious grinding)
Eliminate CV joint
Uses two U-joints
Bolt on deal with little modification
Looks much much cleaner than stock
Cheap mod
Fights steering slop
Im going to start off saying that this can be done by anybody who has coomon sense and has decent or good skills with a grinder, sawzall and a Dremel. You have to start with a trip to the junk yard. I got mine off of an '88 Jeep Cherokee 4x4. I looked at some 2x4 and 4x4 and didnt really notice any differences. Now these years went from 87ish to 94 I believe, like TRY ME said in one of his posts, its the boxy style. And its not in the sport or the grand. I only say this part because I didnt see any in the JY.
Once you have your shaft, go home :lol: I paid $8 for my shaft. First thing, pull the shaft apart, mine was old and stcuk but I got a vise and put a pipe wrench snug on the lower half and gently tapped it out. Once the shaft is out you want to grab the inner shaft and cut off 5" with a sawzall and you should have somethign like this:

Now for this part, I would definately recommend a machine shop, you have to slot the new shaft just how the old shaft is. I did it this way to re-use the spring retainer that goes in the stock shaft. This is done to take the play out of the shaft when they are put together. The length is 2 3/4" and the depth is almost 1/8". When you are doen it should look like this:

The stock shaft is on the left and the new shaft on the right. Just to the left of the new shaft is the spring retainer we are machining for.
Now you clean up your piece and paint it if you want. Then take your lower shaft and slide it into your upper shaft for a test fit (if you machined it yourself that is). You should have this:

And collapsed:

It should be pretty obvious which one is upper and lower, just look at your steering column and gear box. When I installed mine, I installed the upper first and tightened down the bolt. Then I installed the lower, do not forget the spring retainer or you will have play. It is not very slideable with the retainer in there so I used a pickle fork on a joint and tapped it on down from the wheel well. Hope this helps.